


Cosplay WIP: Kos-Mos From Xenosaga 3
- Maririn
- Jun 13, 2019
- 3 min read
Hey all! This blog was originally posted on my tumblr on 07/17/14, but I've added more details on the post as I've gotten a lot of questions on HOW it was made. I was browsing through my photos and found WIP stuff I hadn't uploaded! woot Let's GO~
Today, I would like to talk about Kos-Mos!
I had made a swimsuit version (blog coming soon!) and Version 4 outfit from Xenosaga 3 - But here, I’ll be covering the Version 4:


Why I chose this Character? Simple. She’s SUPER BAD-ASS. Ok, well not only that - we have the same name - Spoiler Alert - My real name is Mary and she’s a Mary.
From this game, I felt like a lot of characters went through major character development stages - especially Shion, the main character who goes through the Hero Myth stage (stuff from Literature lol). Anyhow, Kos-Mos goes through a surprising character development when her eyes change color (like total 180 degree personality change - more like a personality was given to her**haha i’ll stop spoiling now) and I thought it was interesting to play such a character. It was a challenge to not being able to smile when wearing the red contacts… Costume-Play is definitely a form of Acting =)
OK so first, I started with a bra from Daiso as usual and worked up a pattern from an old clubwear dress from my closet. I basically used this white, smooth and stretchy fabric and sewed the bra right on it, making it a "dress". Then I made an exercise bra out of stretchy fabric which was modified to look okay under that diy dress:


Originally, my friend, Tatsumi Kei Cosplay made the armor part base for me, but with the weather being all cray and humid, the paint didn't dry properly and it became so sticky that the paint started peeling off... Instead, I took the patterns she used and made another version of the same thing with EVA foam. To make these huge foam parts, I used a lot of sheets of the EVA foam and had to flatten it with heat - you have to take each one, heat-gun it, and glue it (bumpy sides) together with Barge cement glue.


See how the bumpy sides became flat? It was a super annoying process but with it, I was able to make all the other parts with EVA foam. Just cut the pattern, heat it, and bend/flatten it. Since foam is porous, I had to use wood glue then wait overnight so it dries - it makes the foam more smooth - this method works on worbla too! Bumpy material = gotta layer it with mod podge or wood glue in order for the paint to glide onto the armor parts.
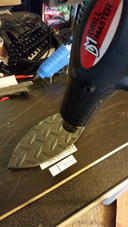
For the other shapes, I bought a dremel tool and started carving the parts in my backyard.
This took DAYS O_O. Luckily some of Tatsumi's armor pieces were workable - the spine section and some of the headgear kept its shape - I was able to just cover pieces with more paint


...Excuse my empty bottles of err... beer.
After more gluing and layering paint, the armor pieces started looking COOL O_O:


The leg covers were made to fit my platform heels, and I had to use a lot of velcro and duct tape to secure it! All the parts were coming together but was difficult to attach together as worbla wasnt secure enough; I had to reinforce with my favorite = gorilla duct tape. All the parts were made and blueprints were just as complicating as wearing them all together without anything falling apart lol


I styled the wig from epiccosplay.com silver blue i think?? The headgear started to take shape as well - I used an elastic band to tie the headgear parts together. This was the only way that worked without it falling off my head.


The completed parts eventually looked like this:


As an extra bonus, I had made the G-Shot - with cardboard, Gorilla duct tape, and PVC pipes from home depot. It was super cheap to make this. Costed me $12 ^_^


Then finished outfit looked like this: (photo by Kurisu Zoleta)


More pics will be uploaded onto “Gallery” section.
Thank you so much for reading this! Now I need to make a second G-Shot…
Maybe an R-Blade!
This costume was one of my New Year’s Resolution and I’m glad I made it happen! It took me MONTHS to create this outfit... but in the end it was worth learning about it! Thanks so much for reading and I hope you enjoyed it <3